
Well everyone I'm not sure how long it will be before I'm back online, so I will catch up with everyone soon!!
Can't wait to see what everyone has been making when I get back up & running & hopefully I will have had a chance to make something too.
Unfortunately we will be back with dial up instead of high speed broadband so it will be a lot slower when I want to upload but I will def get back here.
take care :)
xRima
Monday, March 31, 2008
A couple of new stamped cards
I got a few new stamps & I quickly done these before I packed everything up.
I can't tell you what I used as I have packed it all away, but they were very cute & fun to make, I esp love the make a wish one!!
Celebrate - Happy Birthday

Make a wish

I can't tell you what I used as I have packed it all away, but they were very cute & fun to make, I esp love the make a wish one!!
Celebrate - Happy Birthday
Make a wish
My Goodies from Enfys
My goodies arrived from Enfys the other day & I appologise for not getting them up sooner but with packing everything away for the move, I just haven't had time.... so here they are!!

They are just so cute!!
Thanks again Enfys
They are just so cute!!
Thanks again Enfys
Mini Birthday Cards
When I got this stamp I thought it was so cute so I made up some smaller cards to have on hand. They measure 3.5"x3.5" & I made the circles with the george cricut cartridge & the circle silhouettes too. I used my watercolour pencils & blending pen to colour the stamps & I added little rubons to the corners to decorate.

My Husband & I are taking over the management of a hotel, so I won't be around for awhile as we are in the middle of moving, I'm not sure how long it will be before we have the computer up & running again, so I will see you all again soon when we are settled.
Take care ..... until then
xRimax
My Husband & I are taking over the management of a hotel, so I won't be around for awhile as we are in the middle of moving, I'm not sure how long it will be before we have the computer up & running again, so I will see you all again soon when we are settled.
Take care ..... until then
xRimax
Saturday, March 22, 2008
Album for my Sister Wai
Since meeting my sister from America, for the very first time back in November last year, we have had plenty of photos of the last 4 months of her stay here. Unfortunately her time has come to return to her family in Utah & for us to say goodbye, in 2 days we head for the airport for a teary farewell.
I have been compiling some photos of her arrival, first this & first that, etc (mind you we have like 3 discs full of precious memories, but I had to narrow it down) & I bought this chipboard album & decorated it & then made some page LO's. This was made when she was visiting other relatives etc, so it's not quite as indepth as I would have liked to have gone, but time constraints & the whole sneaky process kind of got in the way haha
There are 20 pages to the album (well there was more in the kit but I couldn't close the covers in the end, so I removed the spare ones).
OK so to start with we have the kit, the album, pages & rings:
Then I decorated it with a light yellow PP with white dots.


So now that the album was covered it's time for the LO's.
To give you an understanding as to why it is the first time we have met, we have the same father, but different mothers & when my sister was old enough she went the US for a holiday & there she met her wonderful hubby & made her life. We had contact on the internet via emails & MSN & I would call her once or twice a month, but for so long we all wanted to meet her. I have 2 other sisters & 3 brothers that hadn't met her either, so there was a huge void for all of us. So nearly 25 years after finding about each other, we were finally going to meet!!!
Ok so enough with the whole "Days of our Lives" ...
I will show you more of the album.... ; )
Well here is the opening page: she calls herself "The Princess with the pink fluffy slippers " so this page is in reference to that.
I used: Glitter stack PP, "The Princess" purple ribbon, pearl halves, I cut the crown & slipper from my cricut cartridge - "Happily Ever After" , decorated them with assorted jewel embellishments & feathered wool on the slipper (& entered it into the challenge at the BBTB) , I printed the sentiment on the computer & cut out a tag with my cricut & put some rubons at the bottom of it.

So after months of counting down the days to her arrival, November 26th, 2007 had finally arrived!! So we head off to the airport & met up with the family as we all waited anxiously for the clock to tick over.
The excitement & the butterflies were overwhelming, we all
joked & laughed & mucked around together taking lots of
pictures before she even got there haha.
The top picture is one of my sisters taking a photo of me, taking a photo of them ...haha we are so crazy, the bottom left photo is Me & the one on the right is Me with our second eldest son , he was pushing me around on the airport luggage trolley we had ready & waiting.

By now the time was getting nearer, us sisters (& our partners & children etc) were all waiting for our "big" sister to arrive, & we were getting more & more excited by the minute. So we posed for treasured memory photos, our two girls made their auntie welcome banners & then we all went & stood at the doors waiting for that special moment of her walking through them.

Her plane has landed!!
Now we were waiting for her to go through Customs & the next thing we hear is one of our sisters yell out "Wai" (pronounced why, that's our sister we were waiting for name)
With that everyone was waving & all our waiting was finally over

This page is just my thoughts journalled:
For years we have talked about one day getting to meet you!! And with having a large family Christmas, this seemed the prime time to make this happen. For the first time EVER, all of us Sisters would be together with the added bonus of our oldest brother David too!
Not only is it us as Sisters meetingfor the first time, there is a lot of nieces & nephews & brother-in-laws desperately wanting to get to know YOU!!
So on behalf of all of us, we hope to make this a holiday you will always remember, thus taking home with you, lots of special family memories too !!

This is a very special page, it is a photo of our first hug!! I made a heart pocket to record the date & my thoughts...
I used: lots of pearl ribbon, floral PP, eyelets, hearts & gold string to decorate


This is a close up of the heart once it is removed from the pocket, the title & date is letter stickers. On the back of the heart, I have once again journalled some thoughts.
I have been compiling some photos of her arrival, first this & first that, etc (mind you we have like 3 discs full of precious memories, but I had to narrow it down) & I bought this chipboard album & decorated it & then made some page LO's. This was made when she was visiting other relatives etc, so it's not quite as indepth as I would have liked to have gone, but time constraints & the whole sneaky process kind of got in the way haha
There are 20 pages to the album (well there was more in the kit but I couldn't close the covers in the end, so I removed the spare ones).
OK so to start with we have the kit, the album, pages & rings:

Then I decorated it with a light yellow PP with white dots.


So now that the album was covered it's time for the LO's.
To give you an understanding as to why it is the first time we have met, we have the same father, but different mothers & when my sister was old enough she went the US for a holiday & there she met her wonderful hubby & made her life. We had contact on the internet via emails & MSN & I would call her once or twice a month, but for so long we all wanted to meet her. I have 2 other sisters & 3 brothers that hadn't met her either, so there was a huge void for all of us. So nearly 25 years after finding about each other, we were finally going to meet!!!
Ok so enough with the whole "Days of our Lives" ...
I will show you more of the album.... ; )

Well here is the opening page: she calls herself "The Princess with the pink fluffy slippers " so this page is in reference to that.
I used: Glitter stack PP, "The Princess" purple ribbon, pearl halves, I cut the crown & slipper from my cricut cartridge - "Happily Ever After" , decorated them with assorted jewel embellishments & feathered wool on the slipper (& entered it into the challenge at the BBTB) , I printed the sentiment on the computer & cut out a tag with my cricut & put some rubons at the bottom of it.

So after months of counting down the days to her arrival, November 26th, 2007 had finally arrived!! So we head off to the airport & met up with the family as we all waited anxiously for the clock to tick over.
The excitement & the butterflies were overwhelming, we all
joked & laughed & mucked around together taking lots of
pictures before she even got there haha.
The top picture is one of my sisters taking a photo of me, taking a photo of them ...haha we are so crazy, the bottom left photo is Me & the one on the right is Me with our second eldest son , he was pushing me around on the airport luggage trolley we had ready & waiting.

By now the time was getting nearer, us sisters (& our partners & children etc) were all waiting for our "big" sister to arrive, & we were getting more & more excited by the minute. So we posed for treasured memory photos, our two girls made their auntie welcome banners & then we all went & stood at the doors waiting for that special moment of her walking through them.

Her plane has landed!!
Now we were waiting for her to go through Customs & the next thing we hear is one of our sisters yell out "Wai" (pronounced why, that's our sister we were waiting for name)
With that everyone was waving & all our waiting was finally over
She was here!!
I used cut outs from my cricut, ribbon, a plane embellishment, brads & lots of stickles to decorate

This page is just my thoughts journalled:
For years we have talked about one day getting to meet you!! And with having a large family Christmas, this seemed the prime time to make this happen. For the first time EVER, all of us Sisters would be together with the added bonus of our oldest brother David too!
Not only is it us as Sisters meetingfor the first time, there is a lot of nieces & nephews & brother-in-laws desperately wanting to get to know YOU!!
So on behalf of all of us, we hope to make this a holiday you will always remember, thus taking home with you, lots of special family memories too !!

This is a very special page, it is a photo of our first hug!! I made a heart pocket to record the date & my thoughts...
I used: lots of pearl ribbon, floral PP, eyelets, hearts & gold string to decorate


This is a close up of the heart once it is removed from the pocket, the title & date is letter stickers. On the back of the heart, I have once again journalled some thoughts.
For as long as I can remember, I have dreamt about meeting my sister in America.
Now 20 something years later, here you are!! love your baby Sis Rima -x-

 This is the both us together on Christmas day at Christmas dinner. This obviously was our first Christmas together too & we had a rather large gathering last year of over 30 family & friends, needless to say it was very special for everyone!!
For this page I used: more glitter stack PP, you & me cut from my cricut & stickled, rounded cornered rectangle frames, also from my cricut &at the bottom I made an envelope of love (also with my cricut.
This is the tag when it's pulled out


This page is just us sisters being silly... the top photo is of 2 of us sisters (they are actually full sisters, so they are being silly together)
& the bottom photo is me with one of my sisters.
I used more glitter stack PP, heart frames cut with my cricut & smaller hearts, to resemble the bubbles floating each with acetate behind them for the wet look. On the Penny Black Stamp - Love Bubbles, I used water coloured pencils witha blending pen & glossy accents for the bubbles.

Now this page is very very special, well not so much the page but the photo on it. In October last year, one month before our sister was to come out to Australia, she was in a coma after an operation, as was my B-I-L (pictured with her) after a heart attack.
They both were very sick & in my B-I-L's case, we didn't know if he was going to survive!!
The uncanny thing is one was in America & the other was in Australia & they both went into the comas at the same time & both "woke up" at the same time & being released at the same time, half way across the world from each other!!!
Thankfully they both came out of the coma's & made recoveries enough for one; our sister to travel & secondly, our B-I-L to be released from hospital.
And seeing them sitting together at the airport, on her arrival was something very special indeed!!

Wai brought with her some Mickey Ears she had embroidered with our girls names & one of our nieces, who is Mickey's "biggest fan"
I cut Mickey & his Ears out with my cricut & the Mickey & Friends cartridge & used some Disney printed ribbon embellishments to decorate.

These are special photos, Wai with our brother, our sister, our niece & my Mum, who she calls "Mamma Joan".
I used more glitter stack PP, paper hibiscus flowers with pearl halves & satin ribbon to decorate.

More special photos, my children with their Auntie.

This is the final page, with two of my sisters celebrating their birthdays together for the very first time. Their special days are only a week apart, so we celebrated on the weekend in between.
I used Innovation Only - One heart, One mind PP
pink satin ribbon
gel pens for the dots on the scallops & pearl halves,
a scallop border at the bottom edge of the photo & a scallop square with a circle all cut from my cricut.
*Birthday Girls* is computer generated.
Well thanks for perserveering with such a long blog!! I will present this to her tomorrow night at her farewell dinner.
Now 20 something years later, here you are!! love your baby Sis Rima -x-

This is our niece having her first cuddles.
I used: Glitter stack Butterflies & flowers PP and paper hibiscus flowers attached with little gold brads.
I used: Glitter stack Butterflies & flowers PP and paper hibiscus flowers attached with little gold brads.

For this page I used: more glitter stack PP, you & me cut from my cricut & stickled, rounded cornered rectangle frames, also from my cricut &at the bottom I made an envelope of love (also with my cricut.
This is the tag when it's pulled out


This page is just us sisters being silly... the top photo is of 2 of us sisters (they are actually full sisters, so they are being silly together)
& the bottom photo is me with one of my sisters.
I used more glitter stack PP, heart frames cut with my cricut & smaller hearts, to resemble the bubbles floating each with acetate behind them for the wet look. On the Penny Black Stamp - Love Bubbles, I used water coloured pencils witha blending pen & glossy accents for the bubbles.

Now this page is very very special, well not so much the page but the photo on it. In October last year, one month before our sister was to come out to Australia, she was in a coma after an operation, as was my B-I-L (pictured with her) after a heart attack.
They both were very sick & in my B-I-L's case, we didn't know if he was going to survive!!
The uncanny thing is one was in America & the other was in Australia & they both went into the comas at the same time & both "woke up" at the same time & being released at the same time, half way across the world from each other!!!
Thankfully they both came out of the coma's & made recoveries enough for one; our sister to travel & secondly, our B-I-L to be released from hospital.
And seeing them sitting together at the airport, on her arrival was something very special indeed!!

Wai brought with her some Mickey Ears she had embroidered with our girls names & one of our nieces, who is Mickey's "biggest fan"
I cut Mickey & his Ears out with my cricut & the Mickey & Friends cartridge & used some Disney printed ribbon embellishments to decorate.

These are special photos, Wai with our brother, our sister, our niece & my Mum, who she calls "Mamma Joan".
I used more glitter stack PP, paper hibiscus flowers with pearl halves & satin ribbon to decorate.

More special photos, my children with their Auntie.

This is the final page, with two of my sisters celebrating their birthdays together for the very first time. Their special days are only a week apart, so we celebrated on the weekend in between.
I used Innovation Only - One heart, One mind PP
pink satin ribbon
gel pens for the dots on the scallops & pearl halves,
a scallop border at the bottom edge of the photo & a scallop square with a circle all cut from my cricut.
*Birthday Girls* is computer generated.
Well thanks for perserveering with such a long blog!! I will present this to her tomorrow night at her farewell dinner.
Happy Easter!!
Carol has us all doing crazy things like taking photos of
ourselves "today" for a blog candy challenge!!
Well our girls had just woken up & we were taking photos of
all the Easter Eggs the Eater Bunny had left,
so I figured I join the challenge!!
Now remembering its early morning,
kids are screaming with delight
& I'm taking photo's haha
So here I am:

Wow OK that looked way better on the camera haha
& here are our girls after collecting all the little eggs scattered through the loungeroom & outside

Riana (10) & Tyanne (5)
Well thats enough of the wonderful photo's of me :)
as I love taking photos but not having my photo taken
Have a great Easter Everyone
x Rima
ourselves "today" for a blog candy challenge!!
Well our girls had just woken up & we were taking photos of
all the Easter Eggs the Eater Bunny had left,
so I figured I join the challenge!!
Now remembering its early morning,
kids are screaming with delight
& I'm taking photo's haha
So here I am:
Wow OK that looked way better on the camera haha
& here are our girls after collecting all the little eggs scattered through the loungeroom & outside
Riana (10) & Tyanne (5)
Well thats enough of the wonderful photo's of me :)
as I love taking photos but not having my photo taken
Have a great Easter Everyone
x Rima
Wow I'm lucky... I was given this beautiful award from Tonya, Bee & Lynn
Like them both, I'm very
greatful that people are visiting my blog.
I appreciate all the lovely comments I get
and I love visiting the people who visit me!
Here's my award; isn't it pretty? ¡Que bonita!
This award originates from the Spanish blog Arte y Pico (which really helps me practice my español). Before we go on to the rules and my passing the award forward...I wanted to share a couple of things from Arte y Pico.
Check out this cake! I thought it was so cute!! Yes, it really is a cake. It is made using fondant. There's a claim that it is easy to make...ummm....hmmm...I made it through Wilton I & II but I don't know about that...
And remember when these Capri Sun purses were all the rage several years ago??
There's some cool stuff on this blog. Very creative stuff!
The rules!
1) You have to pick 5 blogs that you consider deserve this award for their creativity, design, interesting material, and also contributes to the blogging community, no matter what language.
2) Each award has to have the name of the author and also a link to his or her blog to be visited by everyone.
3) Each award winner has to show the award and put the name and link to the blog that has given her or him the award itself.
4) Award-winner and the one who has given the prize have to show the link of "Arte y Pico" blog , so everyone will know the origin of this award.
5) To show these rules.
Ok so my choices are (man this difficult... only 5 huh??)
1. Becky
2. Tracey
3. Gayle
4. Nicola
5. Kim
Wow... OK you deserving gals, pass that on to all those other great blogs out there!!
Have a great day
x
Rima
Friday, March 21, 2008
Humour card for Sharon's blog candy
This is my humour card for Sharon's blog candy

The two blurbs say "Impersonate us will you??
& "Paybacks a Beech"
a bit of a play on words... butI wasn't totally happy
doing this to such a cute stamp, but when I saw
Sharon's blog I knew what I wanted to do straight away
The two blurbs say "Impersonate us will you??
& "Paybacks a Beech"
a bit of a play on words... butI wasn't totally happy
doing this to such a cute stamp, but when I saw
Sharon's blog I knew what I wanted to do straight away
Sketch #36
These are my cards for this weeks Sketches {by Tamara}
When I do baby cards, I generally do one for a boy & one for a girl, so hence 2 cards for the one sketch!!
Boy:

Girl:

Sketch #36

When I do baby cards, I generally do one for a boy & one for a girl, so hence 2 cards for the one sketch!!
Boy:
Girl:
Sketch #36
Thursday, March 20, 2008
Midwife Thank You Cards
At Kim's Blog, she is having a Blog Candy Challenge for over 5000 hits, Congrats Kim!!
She says: But to win this Blog Candy Prize I propose a challenge....
With the baby boom going on the lovely midwives are very busy, so I would like to see some thank you cards for them! I will open the competition till the 1st April when I will anounce the winner (hopefully my baby would have arrived by then!) I will post a picture of the prize for the winner in a few days so keep watching!
So here my card for it, I have 2 versions, as I couldn't decide which one I liked better :)
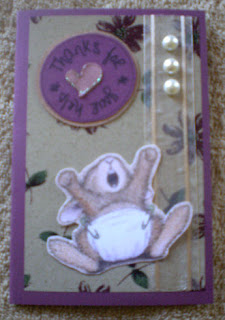

They actually aren't as purple in colour, they are really more maroon
She says: But to win this Blog Candy Prize I propose a challenge....
With the baby boom going on the lovely midwives are very busy, so I would like to see some thank you cards for them! I will open the competition till the 1st April when I will anounce the winner (hopefully my baby would have arrived by then!) I will post a picture of the prize for the winner in a few days so keep watching!
So here my card for it, I have 2 versions, as I couldn't decide which one I liked better :)
They actually aren't as purple in colour, they are really more maroon
Farewell Card

My Sister is leaving for home back to Utah in a couple of days after spending the last 4 months with us!!
So I made her this farewell card for her & at the same time
for the challenge at MY PAPER WORLD sketch #6.
I used : Blue Glitter CS
Sullivans - Sweety PP
Beautiful Hibiscus printed contact
White gel pen for the faux stitching
pearl halves
K & Company - Life's Journey puffy stickers
& white satin ribbon
Tuesday, March 18, 2008
My Easter Bunny Basket
At the BBTB site Regina set a new challenge & it was to use the BUNNY from the DOODLECHARMS cartridge.... I had to make this basket for my daughter to give to her teacher, so I figured I could incorporate it in the challenge .
I used the technique of scoring a sheet of CS into 9 squares.
In this case I used a 6"x6" piece of thick double sided PP, scored it into 9 equal squares, cutting the 2 middle score lines to the first score line on the top & bottom, then folded them leaving the center piece inside & overlapping the other 2 square creating the basket. The handle is made form the same thick double sided PP cut at 1" x 6" in length. I attached it with heart brads & on either side I placed a bunny cut from DC cartridge & cut a red bow from NA cartridge & then I gave him some googly eyes & whiskers.

On the ends I cut out the egg border from DC in glitter paper & I made the grass from the palm tree top on DC cutting it in half.

Then put some lace in the bottom & popped in a few choccie eggs & its ready to go.

I used the technique of scoring a sheet of CS into 9 squares.
In this case I used a 6"x6" piece of thick double sided PP, scored it into 9 equal squares, cutting the 2 middle score lines to the first score line on the top & bottom, then folded them leaving the center piece inside & overlapping the other 2 square creating the basket. The handle is made form the same thick double sided PP cut at 1" x 6" in length. I attached it with heart brads & on either side I placed a bunny cut from DC cartridge & cut a red bow from NA cartridge & then I gave him some googly eyes & whiskers.
On the ends I cut out the egg border from DC in glitter paper & I made the grass from the palm tree top on DC cutting it in half.
Then put some lace in the bottom & popped in a few choccie eggs & its ready to go.
Monday, March 17, 2008
Baby Bottle cards
At the BBTB site, sponsor Charlie wanted us to create a card for a baby (girl or boy) using LIME GREEN and PINK for a girl OR LIME GREEN and BLUE for a boy, so here are my entries:


Thursday, March 13, 2008
Great Candy Giveaway
But you only have until the 17th March, so get over to Hans Crafty Creations pretty quick!!

Thanks Hans for the great Candy giveaway
Thanks Hans for the great Candy giveaway
Wednesday, March 12, 2008
3D Baby Cot
Well as promised, I have made my 3D Baby Cot!! I appologise for the amount of photos there will be but its easier to show what I am trying to describe, so bare with me as I blab on about how I made it :)
Ok well to start with if you go to my original post here to see the shapes I used, it will be easier than repeating that stage.
CS: Bazzill Basics Juneberry
PP: KAISERscrapbook - Be Mine
So using the "Y" shapes (rectangles) I cut out, I stuck the two pieces of CS & PP together & then proceeded to cut out the 1" sections to create the rungs
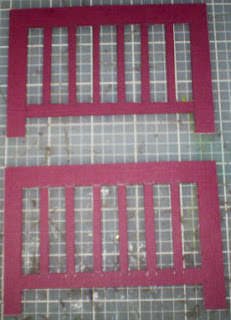
then with the 2 "D" shapes (cylinders), I didn't attach them together yet as it is easier to work with apart (as I found out the hard way, having to re-cut & start this section again)

With scraps of the PP, I cut out some joins to measure the lengths of the sides of the cylinders & also a base stop (at the bottom)

turning over this piece, i then tape up the edges to attach the PP


repeat for the other end of the cot with the other cylinder piece, cutting out a shape for a peek-a-boo spot (such as in this case a heart)
cut out another 2 base stops for the rectangle edges & attach them & then attach the sides of the cots to the joins.
then cut a base card to fit inside the cot, being the width of the cylinder & the length of the rectangle (approx 12cm x 12.5cm)
glue one edge of the card base to the side of the cot (use heavy tape or glue as when it folds, it can come apart if not secured properly)

so when it is flat it can go into an envelope for mailing

When the base is down, the card becomes 3D:


Now to decorate!!
Items used: New Arrivals Cricut Cartridge - baby
Tear Drop Cricut Cartridge - girl
George Cricut Cartridge - AK & 1" circles
Green Alphabet letter buttons
Celebrate polyester green spotted ribbon
Hibiscus Flowers
Pearl halves
Green & White Flower beads
heart buttons
Foot, hand & bottle metallic embellishments
Metallic flower ribbon
Pearl ribbon
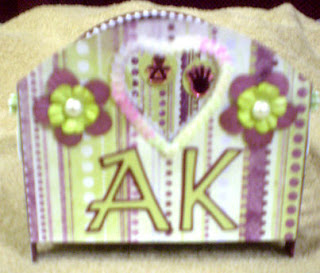
Front of the cot view
Top shot

Side view with her name Alyssa

other side view with her middle name Kate

back view of the cot

top view with lace bedding

Thanks for having a look & if you have any questions email me & I will try & answer as best I can
Ok well to start with if you go to my original post here to see the shapes I used, it will be easier than repeating that stage.
CS: Bazzill Basics Juneberry
PP: KAISERscrapbook - Be Mine
So using the "Y" shapes (rectangles) I cut out, I stuck the two pieces of CS & PP together & then proceeded to cut out the 1" sections to create the rungs
then with the 2 "D" shapes (cylinders), I didn't attach them together yet as it is easier to work with apart (as I found out the hard way, having to re-cut & start this section again)
With scraps of the PP, I cut out some joins to measure the lengths of the sides of the cylinders & also a base stop (at the bottom)
turning over this piece, i then tape up the edges to attach the PP
repeat for the other end of the cot with the other cylinder piece, cutting out a shape for a peek-a-boo spot (such as in this case a heart)
cut out another 2 base stops for the rectangle edges & attach them & then attach the sides of the cots to the joins.
then cut a base card to fit inside the cot, being the width of the cylinder & the length of the rectangle (approx 12cm x 12.5cm)
glue one edge of the card base to the side of the cot (use heavy tape or glue as when it folds, it can come apart if not secured properly)
so when it is flat it can go into an envelope for mailing
When the base is down, the card becomes 3D:
Now to decorate!!
Items used: New Arrivals Cricut Cartridge - baby
Tear Drop Cricut Cartridge - girl
George Cricut Cartridge - AK & 1" circles
Green Alphabet letter buttons
Celebrate polyester green spotted ribbon
Hibiscus Flowers
Pearl halves
Green & White Flower beads
heart buttons
Foot, hand & bottle metallic embellishments
Metallic flower ribbon
Pearl ribbon
Front of the cot view
Top shot
Side view with her name Alyssa
other side view with her middle name Kate
back view of the cot
top view with lace bedding
Thanks for having a look & if you have any questions email me & I will try & answer as best I can
Subscribe to:
Posts (Atom)


