
Ok well to start with if you go to my original post here to see the shapes I used, it will be easier than repeating that stage.
CS: Bazzill Basics Juneberry
PP: KAISERscrapbook - Be Mine
So using the "Y" shapes (rectangles) I cut out, I stuck the two pieces of CS & PP together & then proceeded to cut out the 1" sections to create the rungs
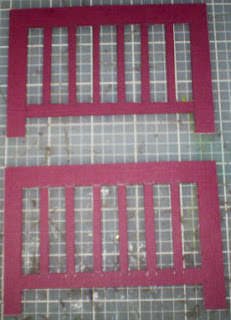
then with the 2 "D" shapes (cylinders), I didn't attach them together yet as it is easier to work with apart (as I found out the hard way, having to re-cut & start this section again)

With scraps of the PP, I cut out some joins to measure the lengths of the sides of the cylinders & also a base stop (at the bottom)

turning over this piece, i then tape up the edges to attach the PP


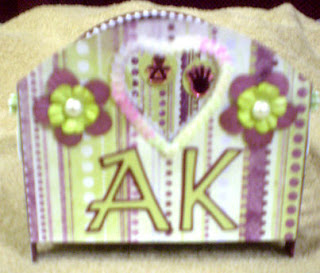
repeat for the other end of the cot with the other cylinder piece, cutting out a shape for a peek-a-boo spot (such as in this case a heart)
cut out another 2 base stops for the rectangle edges & attach them & then attach the sides of the cots to the joins.
then cut a base card to fit inside the cot, being the width of the cylinder & the length of the rectangle (approx 12cm x 12.5cm)
glue one edge of the card base to the side of the cot (use heavy tape or glue as when it folds, it can come apart if not secured properly)

so when it is flat it can go into an envelope for mailing

When the base is down, the card becomes 3D:


Now to decorate!!
Items used: New Arrivals Cricut Cartridge - baby
Tear Drop Cricut Cartridge - girl
George Cricut Cartridge - AK & 1" circles
Green Alphabet letter buttons
Celebrate polyester green spotted ribbon
Hibiscus Flowers
Pearl halves
Green & White Flower beads
heart buttons
Foot, hand & bottle metallic embellishments
Metallic flower ribbon
Pearl ribbon
Front of the cot view
Top shot

Side view with her name Alyssa

other side view with her middle name Kate

back view of the cot

top view with lace bedding

Thanks for having a look & if you have any questions email me & I will try & answer as best I can


12 comments:
OH MY GOSH!!! How adorable and what fantastic instructions!!! You're amazing! That had to take you forever! Thank you for spending the time to do this for us!! I really love this!!
Thanks for the comment Sharon,it actually only took a couple of nights to make, the longest part of it was deciding what to embellish it with :)
Wow!!! this is absolutley gorgeous must have taken ages xx
This is positively fabulous!!! I can't wait to know someone having a baby shower!! This would be fantastic to make!!
Wow Rima, the cot is just gorgeous, I love it.
I live in NSW, Taree, on the Mid North Coast. I think i wrote that backwards but anyway lol.
Oh my goodness, this is absolutely amazing. What a gorgeous crib. Thanks for the tutorial also. I will definitely be giving this one a try.
Great card idea! Wow! Love the detail so adorable!
SIsterhood 14 new member
Oh my goodness!!! Did you submit this to the Chirp? This is amazing! I'm thrilled that you stopped by to visit my blog, thank you for the lovely comment, and I'm honored that you added a link to my site. I'm off to look at more of your work, but wow, you're talented!! Take care!
Holy moly, it took me forever to find the page to submit! It's under "promotions" . . . try this link:
http://www.cricut.com/promotions/onlinesubmit.aspx
Good luck! It's spectacular! If you submit, you should ALSO link them to your blog entry, because your step-by-step directions are fantastic!
Wow! That looks totally amazing! Thanks so much for sharing!
Holy Cow, this is fantastic. What a work of art, Rima. Fantastic...!!!!
Thanks so much for the great instructions Rima, such patience! Great project. By the way, your parcel is on the way!
Post a Comment